Wednesday 3 September 2014

Home Canning – Dos & Don’ts!

Looking for automatic can sealers? Well, there’s certainly an upswing as more people are starting to can and preserve their own fresh food, with good reason. Canning your own food is an excellent means to save money. In these days of a tough economy, everyone is looking to save where they can. But before you begin canning and preserving food at home, you need to understand that there are certain Dos & Don’ts for home canning that are essential to safely and securely preserving food. These follow:

all-american-model-1502
Dos:

• Wash your hands

• Start with fresh quality vegetables and fruits that have been properly rinsed & scrubbed with the help of a vegetable brush to eradicate debris.

• Select the perfect canning procedure for the food being preserved.

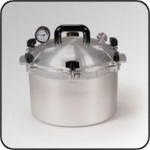
• Have all of your canning utensils ready to use before you begin.

• Wash and disinfect the canning pot

• Allow for appropriate head space when filling the pot

• Follow the canning recipes precisely

• Stick with recommended processing time for every canning project

• Label the canned goods with their content and date of processing

• Store canned food in a cool, dry place.

Don’ts:

• Don’t make use of open kettle or any kind of oven procedure for preserving and canning. The USDA and other influential sites have declared that this is no longer a secure means to can food.

• Do not diverge from canning recipes; they’re calculated to ensure that the foods will remain safe and process appropriately.

• Once processed don’t store jars upside down

• Do not under process the foods being canned

• Don’t consume any canned foods that seem to have not sealed appropriately and/or have discoloration or mold.

Follow Chef's Kitchen on:-
 
facebook twitter linkedin
facebook

Tuesday 2 September 2014

How to Perform Pressure Canning ?

Low acid foods like vegetables, poultry, fish and meats should be processed properly in pressure canner to obliterate the heat-defiant microbes that could source food poisoning. An extreme temperature can be reached only in a pressure canner.

all-american-model-915-150x150If you are a first-time user, you must read the directives available with the pressure canner so that you can become familiar with its operation. First of all, you need to ensure that all parts of the canner are dirt free and in proper working condition. If your pressure canner has a spring dial measure, have it verified for accuracy. When all set ready to begin canning, set your canner with support on the range and put in two or three inches of steaming water or the quantity specified by your canner manufacture. Then, turn the temperature to a low degree. Next, get ready adequate meat or vegetables for one canner to fill. Then, fill up each jar and put it inside the canner. Jars shouldn’t touch.

After the last pot is incorporated, cover & fastens the canner. When steam begins to come out of the petcock or open vent, decrease the temperature so steam pours liberally at a reasonable rate. Allow steam to pour steadily for ten minutes or more to drain air from the canner. Shut the vent & amplify pressure. Turn up & maintain the temperature until you reach ten to fifteen pounds pressure. Adjust the temperature to maintain even pressure. Even pressure is crucial because any vacillation will draw out liquid from the pots.

Take away the canner from gas & set out draft on a wooden board or wire rack. Enable the pressure to go back to standard on its own. Don’t run water on the canner or rush for cooling. Pursue the instructions of the canner for unlocking the pressure canner. Ensure to raise the cover of the canner away from you to ignore a gust of hot vapor. If foods are still boiling forcefully in pots, hang around a few minutes before taking away from the canner. Then, cool pots two to three inches separately on a wooden board or towels in a draft-free area.

Make sure for appropriate sealing on the pots after they’re totally cooled. Don’t forget to heat the foods processed inside the pressure canner for ten to fifteen minutes before using or tasting. Put in water, if essential.